Battery switch on travel trailer function is crucial for managing your RV’s power. Understanding how to use your battery switch correctly is key to preventing costly battery damage and ensuring you have power when you need it. This guide covers everything from the different types of switches to troubleshooting common problems, helping you become a confident RV power manager.
We’ll explore the various types of battery switches – single, dual, and selector – and delve into their internal workings. Learn how to safely connect and disconnect your batteries, and discover how the battery switch interacts with other power systems like solar, generator, and shore power. We’ll also cover essential maintenance, troubleshooting, and even selection and installation tips.
Understanding Battery Switch Functionality in Travel Trailers
Your travel trailer’s battery switch is a crucial component, acting as the central control for your trailer’s power systems. It allows you to disconnect your batteries from the trailer’s electrical system, preventing battery drain when the trailer is stored or not in use. Understanding its function and proper operation is key to maintaining your trailer’s battery health and preventing potential problems.
Battery Switch Purposes
The primary purpose of a battery switch is to isolate your trailer batteries from the rest of the electrical system. This prevents parasitic drain—a slow but constant discharge of your batteries even when the trailer isn’t being used—which can leave you with a dead battery when you’re ready to hit the road. Additionally, a battery switch can help protect your batteries and electrical system from damage caused by short circuits or other electrical faults.
In some cases, a battery switch can also allow you to choose which battery bank (if you have more than one) powers your appliances.
Types of Battery Switches
Several types of battery switches cater to different needs. A single battery switch is the simplest, connecting or disconnecting a single battery bank to the trailer’s electrical system. Dual battery switches control two separate battery banks independently, allowing for separate management of, for instance, a house battery and a starting battery. Selector switches offer more control, enabling you to choose which battery bank powers the trailer’s appliances or to connect both banks together for combined power.
Some more advanced systems incorporate digital displays and remote control capabilities.
Internal Workings of a Typical Battery Switch
A typical battery switch operates using a mechanical mechanism. The switch itself is a multi-position rotary switch, typically with positions for “Off,” “Battery 1,” “Battery 2,” and sometimes “Both.” Each position connects or disconnects the corresponding battery bank(s) to the trailer’s wiring harness. The switch’s internal components include heavy-duty contacts to handle the current flow from the batteries, and a robust mechanism to ensure a secure connection in each position.
The switch is designed to withstand the high currents associated with automotive-grade batteries. Poorly made switches can overheat or arc internally leading to dangerous conditions.
Using a Battery Switch Correctly
Using your battery switch correctly is straightforward. Before connecting to shore power or starting your vehicle, ensure the switch is in the “Off” position. This prevents accidental discharge or short circuits. Once you’re ready to use the trailer, move the switch to the desired position (“Battery 1,” “Battery 2,” or “Both,” depending on your setup). When storing your trailer for an extended period, always switch to the “Off” position to completely isolate the batteries and prevent drain.
Regularly inspect the switch for any signs of damage or corrosion, and replace it if necessary to maintain safe operation. Incorrect use can lead to battery drain, malfunctioning appliances, or even electrical fires.
So, you’re planning a trip? Awesome! First things first: get travel insurance. Seriously, check out Aon travel insurance – they’ve got you covered. Then, if you’re an audiophile like me, you’ll want to check out your audiophile travel setup options before you go. Don’t forget your noise-canceling headphones; trust me, you’ll thank me later!
Connecting and Disconnecting Batteries
Using your travel trailer’s battery switch is straightforward, but safety and proper technique are crucial to avoid damage or injury. This section details the process, safety measures, and troubleshooting common problems. Remember, always consult your specific RV’s manual for detailed instructions.
The battery switch acts as a master control, allowing you to disconnect your house batteries from the trailer’s electrical system. This is important for preventing battery drain when the trailer isn’t in use, and also for safety when working on the electrical system. Most switches have multiple positions, often including “off,” “battery,” “both,” and “shore power.” The “off” position completely disconnects the batteries.
“Battery” connects only the house batteries. “Both” connects both the house and chassis batteries (if equipped), and “shore power” connects the trailer to external power, typically from a campsite hookup.
Battery Connection and Disconnection Procedure
Before making any connections or disconnections, always ensure the battery switch is in the “off” position. This prevents accidental shorts or sparks. Next, locate the battery switch, typically found inside a compartment near the batteries or inside the trailer’s main electrical panel. To connect the batteries, simply turn the switch to the desired position (“battery,” “both,” or “shore power”).
To disconnect, turn the switch to the “off” position. It’s that simple!
Safety Precautions When Working with RV Batteries
RV batteries contain corrosive acid and can produce explosive gases. Always wear safety glasses and gloves when working near them. Ensure adequate ventilation to avoid inhaling fumes. Never allow sparks or flames near the batteries. If you spill battery acid, immediately neutralize it with baking soda and water, then clean the area thoroughly.
Finally, if you’re unsure about any step, consult a qualified technician.
Potential Problems from Improper Battery Switch Use, Battery switch on travel trailer function
Improper use of the battery switch can lead to several issues. For instance, leaving the switch in the “battery” position while the trailer is not in use will drain your batteries, potentially leaving you without power when you need it. Similarly, accidentally connecting the batteries while working on the electrical system could lead to short circuits and damage to components or even injury.
Finally, using the switch incorrectly could damage the switch itself, requiring costly repairs or replacement.
Troubleshooting Common Battery Switch Issues
If your battery switch isn’t functioning correctly, there are a few things you can check. First, ensure the switch itself isn’t faulty; try to visually inspect it for any damage. Next, check the connections to the batteries and the switch. Loose or corroded connections are common causes of problems. Clean any corrosion with a wire brush and baking soda solution.
If the problem persists, you may need to replace the switch or consult a qualified RV technician. A multimeter can be useful to test voltage at various points in the circuit to identify the source of the problem. For example, you could check for voltage at the battery terminals, and then at the output of the switch to see if voltage is being passed through correctly.
A lack of voltage at the switch output, while present at the battery terminals, would suggest a fault within the switch itself.
Battery Switch and Power Management Systems
Your travel trailer’s battery switch is a crucial component in managing power flow, acting as a central control point for your 12-volt DC system. Understanding how it interacts with other power sources is key to efficient and safe operation. This section explains its role in preventing battery drain and how it works within the overall electrical system.The battery switch acts as a gatekeeper, controlling the flow of power between your batteries and the rest of your RV’s 12V system.
It’s not just an on/off switch; it’s a critical element in preventing accidental drain on your house batteries when you’re not using them. This is especially important when your RV is stored for extended periods.
Battery Switch Interaction with Other Power Systems
The battery switch doesn’t work in isolation. It’s a key player in a complex interplay of power sources, including shore power, generator power, and solar power. When shore power is connected, the RV’s converter charges the batteries. The battery switch position determines whether the house appliances draw power from shore power via the converter or from the house batteries.
Similarly, when running a generator, the converter charges the batteries, and the battery switch manages power distribution to the 12V system. Solar panels charge the batteries independently of the switch, but the switch controls how the charged batteries power the RV systems. In short, the switch prioritizes power sources: shore power and generator power will usually charge the batteries first before the batteries power the RV’s systems, unless the switch is in a position that directly connects the batteries to the house load.
The Battery Switch’s Role in Preventing Battery Drain
The primary function of a battery switch, beyond simply connecting or disconnecting the batteries, is to prevent parasitic drain. Parasitic drain refers to the slow, continuous drain on your batteries caused by small electrical loads even when your RV appears to be “off”. These loads can include things like clocks, carbon monoxide detectors, or even small amounts of leakage current.
By turning the battery switch to the “off” position, you completely disconnect the house batteries from the rest of the RV’s 12V system, preventing this drain and ensuring your batteries remain charged for your next adventure. This is especially crucial during long periods of storage.
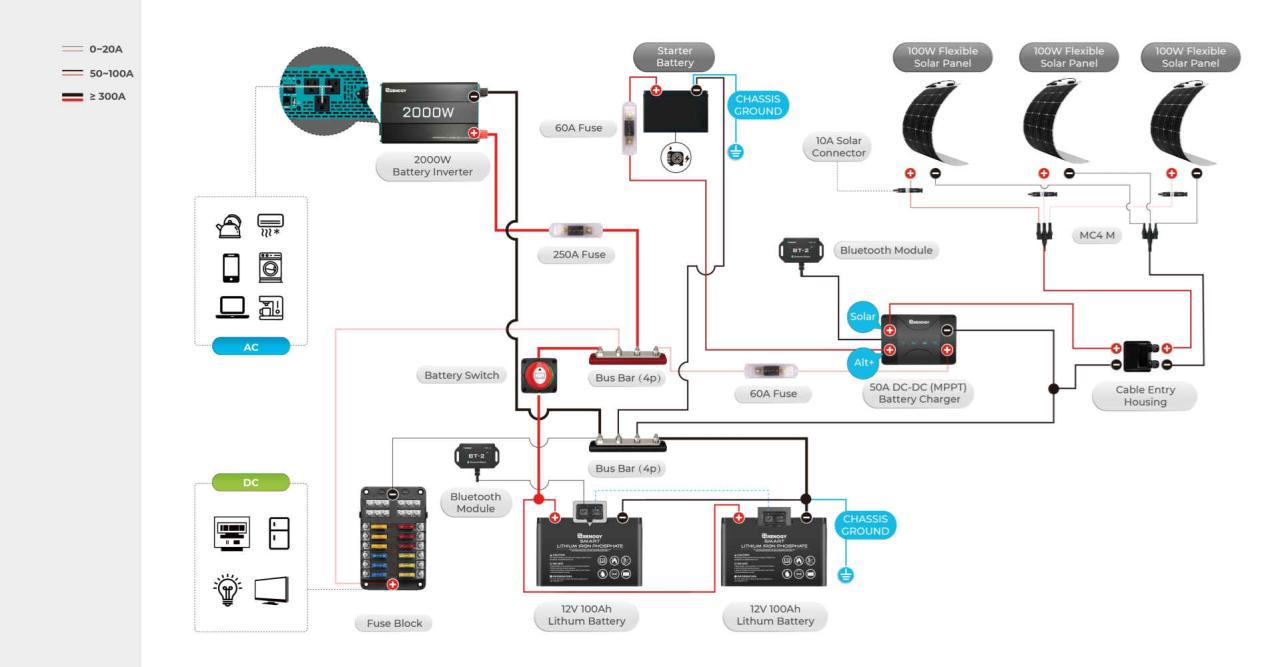
Diagram of RV Electrical System Components
This diagram illustrates the typical connection between the battery switch and other key components in your RV’s electrical system.
| Component | Description | Connection to Battery Switch | Function |
|---|---|---|---|
| House Batteries | 12V DC batteries providing power to RV systems. | Direct connection; controlled by the battery switch. | Power source for lights, water pump, etc. |
| Battery Switch | Controls power flow to and from the house batteries. | Connects to house batteries and the load center. | Main power control for the 12V system. |
| Converter/Charger | Converts 120V AC shore power to 12V DC to charge batteries. | Connected to the load center, indirectly influencing battery charge. | Charges batteries and provides 12V DC from shore power. |
| Load Center | Distribution point for 12V DC power to various appliances. | Receives power from the battery switch and converter. | Distributes 12V DC power throughout the RV. |
| Solar Panel(s) | Generates DC power from sunlight to charge batteries. | Connects directly to the batteries (usually bypassing the battery switch). | Provides supplemental battery charging. |
| Generator | Produces 120V AC power to run appliances and charge batteries. | Power flows through the converter to charge the batteries. | Provides power when shore power isn’t available. |
Battery Switch Maintenance and Troubleshooting: Battery Switch On Travel Trailer Function
Keeping your travel trailer’s battery switch in good working order is crucial for reliable power. Regular maintenance prevents problems and ensures a smooth camping experience. Neglecting maintenance can lead to frustrating power outages and potentially damage your batteries. This section covers a recommended maintenance schedule and common troubleshooting steps.
Battery Switch Maintenance Schedule
A simple maintenance schedule can significantly extend the life of your battery switch and prevent unexpected issues. This involves regular visual inspections and occasional cleaning.
- Monthly Inspection: Visually inspect the switch for any signs of corrosion, loose connections, or damage to the wiring. Pay close attention to the terminals and the switch itself. If you notice anything amiss, address it immediately.
- Annual Cleaning: Once a year, disconnect the batteries from the switch and use a wire brush to clean any corrosion from the terminals. Apply a corrosion inhibitor to the terminals after cleaning to prevent future corrosion. This step is especially important in humid or salty environments.
- Two-Year Inspection: Every two years, consider having a qualified technician inspect the switch and its wiring for any signs of wear or potential hazards. This more thorough check can identify problems before they become serious issues.
Common Battery Switch Problems and Solutions
Several common problems can arise with battery switches. Understanding these issues and their solutions will help you quickly resolve most power problems.
- Corrosion on Terminals: Corrosion is a frequent culprit. This buildup of oxides on the battery terminals and switch contacts prevents proper electrical connection. Cleaning the terminals with a wire brush and applying a corrosion inhibitor is the solution. Remember to disconnect the batteries before cleaning.
- Loose Connections: Loose connections at the battery terminals or the switch itself can interrupt the flow of electricity. Tighten all connections securely. If the connections are excessively worn or damaged, replacement may be necessary.
- Switch Failure: The switch itself can fail due to age, wear, or overheating. Symptoms include an inability to switch between battery banks or a complete loss of power. Replacement of the faulty switch is the only solution. It’s crucial to choose a switch with a similar amperage rating to the original.
- Wiring Problems: Damaged or improperly connected wiring can cause intermittent power or complete power loss. Inspect all wiring for breaks, fraying, or loose connections. Repair or replace any damaged wiring. Always consult a wiring diagram for your specific travel trailer.
Troubleshooting Battery Switch Malfunctions
A systematic approach to troubleshooting is essential when dealing with battery switch malfunctions. Follow these steps to pinpoint the problem and get your power back online.
- Check the Battery Switch Position: Ensure the switch is in the correct position for the desired power source (batteries or shore power).
- Inspect for Loose Connections: Carefully examine all connections at the battery terminals and the switch itself. Tighten any loose connections.
- Check for Corrosion: Look for signs of corrosion on the terminals and switch contacts. Clean and treat any corrosion as described above.
- Test the Batteries: Use a multimeter to check the voltage of your batteries. Low voltage can indicate a problem with the batteries themselves, not the switch.
- Inspect Wiring: Visually inspect all wiring for any damage or loose connections. Repair or replace any damaged wiring.
- Test the Switch Functionality: Use a multimeter to test the continuity of the switch in different positions. If the switch fails the continuity test, it needs to be replaced.
Battery Switch Selection and Installation
Choosing and installing the right battery switch is crucial for reliable power management in your travel trailer. A well-selected and properly installed switch ensures safe and efficient operation of your 12V systems, preventing potential damage and maximizing battery life. This section will guide you through the process, covering different switch types and installation best practices.
Several types of battery switches are available for travel trailers, each with its own advantages and disadvantages. The most common are manual switches, automatic switches, and combination switches incorporating features like a battery meter or remote control. Manual switches are the simplest and most affordable, offering direct control over battery connections. Automatic switches provide convenience, automatically connecting and disconnecting batteries based on voltage levels or other parameters.
Combination switches integrate additional features for enhanced monitoring and control. The best choice depends on your budget, technical skills, and desired level of automation.
So, you’re planning a trip? Awesome! First things first: get travel insurance. Seriously, check out Aon travel insurance – it’s a lifesaver. Then, think about your in-flight entertainment. If you’re an audiophile, digging into a solid audiophile travel setup before you go will make those long flights way more enjoyable.
Don’t forget noise-cancelling headphones!
Battery Switch Model Comparison
The following table compares features of common battery switch models. Consider factors like the number of batteries you need to manage, your budget, and desired level of automation when making your selection. For example, a simple two-battery manual switch is sufficient for many smaller trailers, while larger rigs with multiple batteries and sensitive electronics might benefit from an automatic or combination switch with additional safety features.
| Switch Type | Features | Benefits | Drawbacks |
|---|---|---|---|
| Manual | Simple on/off control, typically two or three positions | Affordable, easy to understand and use | Requires manual operation, no automatic protection |
| Automatic | Automatic switching based on voltage or other parameters | Convenience, automatic battery protection | More expensive, can be complex to install and troubleshoot |
| Combination | Combines manual and automatic switching, often includes a battery meter or remote control | Flexibility, enhanced monitoring and control | Most expensive, can be complex to install and troubleshoot |
Best Practices for Battery Switch Installation
Proper installation is key to ensuring the longevity and safety of your battery switch and electrical system. Follow these steps for a safe and reliable installation. Remember, working with electricity can be dangerous; if you’re not comfortable with electrical work, consult a qualified professional.
- Disconnect the negative battery terminals before starting any work.
- Choose a well-ventilated and easily accessible location for the switch, away from heat sources and moisture.
- Securely mount the switch using appropriate hardware. Ensure the switch is firmly attached and won’t vibrate loose during travel.
- Connect the battery cables to the switch terminals, using appropriately sized wire and connectors. Ensure all connections are clean, tight, and corrosion-free.
- Reconnect the negative battery terminals.
- Test the switch to ensure it’s functioning correctly. Check all connections for proper operation.
Tools and Materials for Battery Switch Installation
Gather the necessary tools and materials before beginning the installation. Having everything prepared will make the process smoother and more efficient. This list includes common items, but specific requirements might vary based on your chosen switch and trailer setup.
- Battery switch
- Appropriate gauge battery cables
- Ring terminals or other suitable connectors
- Crimping tool
- Screwdrivers (Phillips and flathead)
- Wrench (size appropriate for battery terminals and switch mounting hardware)
- Wire strippers/cutters
- Electrical tape
- Safety glasses
- Gloves
Visual Representation of Battery Switch Components
Let’s take a closer look at what a typical battery switch looks like and what’s going on inside. Understanding the physical components will help you better understand how it manages your RV’s power.A typical battery switch for a travel trailer is a relatively compact device, usually made of durable, weather-resistant plastic or metal. Its size varies depending on the amperage rating and number of batteries it’s designed to handle, ranging from roughly the size of a large fist to a small shoebox.
You’ll typically find several large terminals for connecting the batteries and your RV’s electrical system, clearly labeled to avoid confusion. These labels might include “+,” “-,” “Battery 1,” “Battery 2,” “House,” and “Shore Power.” Some switches also include indicator lights showing the current switch position.
Battery Switch External Components
The external components are designed for ease of use and safe connection. They are crucial for preventing accidental shorts and ensuring proper power flow.* Terminals: Heavy-duty terminals, often made of copper or brass, are provided for securely connecting the positive and negative cables from each battery and the RV’s electrical system. These terminals are usually clearly labeled to indicate their function (e.g., “+ Battery 1,” “- Battery 2,” “+ House”).
The size of these terminals varies depending on the switch’s amperage rating, with higher amperage switches needing larger terminals to handle the increased current.
Switch Handle/Lever
A clearly marked handle or lever allows you to easily switch between different power configurations (e.g., battery 1, battery 2, both batteries, or off). The handle’s position will directly correspond to the active power source.
Labels and Markings
Clear and unambiguous labels are essential for safe operation. These labels will indicate the function of each terminal and the switch positions (e.g., “OFF,” “Battery 1,” “Battery 2,” “Both,” “Shore Power”). These labels help prevent accidental misconnections and ensure proper operation.
Enclosure
The entire switch is housed in a protective enclosure, typically made of weather-resistant plastic or metal, to shield the internal components from moisture, dust, and other environmental factors. This helps ensure the longevity and reliability of the switch.
Battery Switch Internal Components
Inside the robust casing, several components work together to seamlessly switch power. Understanding these components aids in diagnosing potential issues.Let’s imagine a typical battery switch with two battery inputs and one output for the house system. Inside, the primary components are:* Contacts: These are heavy-duty metal contacts, typically made of copper or silver-plated copper, that physically connect or disconnect the different circuits.
These contacts are designed to withstand high currents and repeated switching cycles without overheating or damage. The contacts are moved by the switch handle.
Switching Mechanism
This is the mechanical part of the switch that moves the contacts. It’s usually a robust system of levers, cams, or other mechanisms designed for reliable operation and to prevent accidental switching.
Insulation
Insulating materials are used to prevent short circuits between the contacts and the enclosure. These materials are carefully selected to withstand high voltages and temperatures.
Wiring
Internal wiring connects the contacts to the terminals on the outside of the switch. This wiring is often heavy-gauge wire capable of carrying the high currents involved.
Mastering your travel trailer’s battery switch is a game-changer for your RV experience. By understanding its function, performing regular maintenance, and knowing how to troubleshoot problems, you’ll ensure reliable power and extend the life of your batteries. So, grab your owner’s manual, familiarize yourself with your specific switch, and hit the road with confidence knowing you’re in control of your power!
FAQ Explained
What happens if I leave my battery switch in the “off” position for an extended period?
Leaving the switch off prevents any drain on your batteries, protecting them from deep discharge. However, you’ll obviously have no power to your trailer’s systems.
Can I use a battery switch with different battery types (e.g., lead-acid and lithium)?
Generally, no. Different battery types have different voltage and charging requirements. Using an incompatible switch could damage your batteries or the switch itself. Check your switch and battery specifications.
My battery switch feels hot. Is this normal?
A slightly warm switch is normal, but excessive heat indicates a problem. Check for loose connections, corrosion, or a faulty switch. If it’s hot to the touch, turn it off and seek professional help.
How often should I clean my battery switch?
Inspect your battery switch monthly and clean it at least twice a year. Use a wire brush and baking soda solution to remove corrosion.
